IMPORTANT NOTE

  1. Shutdown Sequence:

To shut down the device, please long press the POWER button on back side of the display (ON/OFF button), the system will save the picture and movie automatically, then you can shift the switch on the battery compartment to OFF side to shut down the power supply.


WARNING: If shut down the power supply without press the POWER button on display first, the pictures and the movies document may be DAMAGED!

2. Don’t look directly at the IR Infrared Light, may cause eye damage.

3. We cover a protection foil on the screen to protect the screen during transportation, there may be some scratches on the foil, please seize the green corner of the foil and peel it off, and you will get a brand new screen.

Megaorei 2 Night Vision Instructions Power On

UNPACKING

OPTION 1 INCLUDES FOLLOWINGS:

PICTURE

1x NIGHT VISION CAMERA (3MP, 720 HD, 16mm Lens, Day/Night Vision, Focus Adjustable)

1x 4.3INCH DISPLAY (Record Video, Take Photo, Day/Night Vision, TF Card Slot)

1x 850NM INFRARED IR FLASHLIGHT (High Beam/Low Beam Adjustable)

1x CAMERA TUBE (40-45mm Eyepiece Compatible)

1x 25.4MM DISPLAY MOUNT

1x 30MM DISPLAY MOUNT CLAMP

1x IR FLASHLIGHT MOUNT

1x SCREW DRIVER

1x CAMOUFLAGE TAPE (random color)

1x DISPLAY SUNSHADE

1x Little Screw Driver

OPTION 2 INCLUDES FOLLOWINGS:

PICTURE

1x NIGHT VISION CAMERA (3MP, 720 HD, 16mm Lens, Day/Night Vision, Focus Adjustable)

1x 4.3INCH DISPLAY (Record Video, Take Photo, Day/Night Vision, TF Card Slot)

1x 850NM INFRARED IR FLASHLIGHT (High Beam/Low Beam Adjustable)

1x CAMERA TUBE (40-45mm Eyepiece Compatible)

1x 25.4MM DISPLAY MOUNT

1x 30MM DISPLAY MOUNT CLAMP

1x IR FLASHLIGHT MOUNT

1x SCREW DRIVER

1x CAMOUFLAGE TAPE (random color)

1x DISPLAY SUNSHADE

1x Little Screw Driver

3x Rechargeable 18650 battery

1x Battery Charger with USB plug

1x 32G TF Card (MicroUSB Card)

Megaorei 2 Night Vision Riflescope MGR2-32G TF card-Megaorei 18650 battery with battery charger

PARAMETERS:

Parameter

Display size

4.3 inch

Camera

3MP, 720 HD, 16mm Lens, Day/Night Vision, Adjustable Focus

Flashlight

Infrared flashlight

Flashlight wavelength

850nm

Laser Flashlight Maximum Visible Distance

200-400m

Battery

18650 Lithium Battery (not included)

(2pcs for display, 1pc for flashlight)

Working time of battery

1500mAh  LCD: 5-8 hours  IR: 4-6 hours

Function

720P HD, Take Photo, Record Video

Video/Photo Resolution

1280*720p

Video Format

AVI

Photo Format

JPG

Storage Type

TF Card (MicroSD card)(not included)

Support up to 128G


The inner diameter of the camera tube in the kit is 46mm, the inner diameters of 2pcs of display mount are 25mm and 30mm.

So it is suitable for 25mm or 30mm diameters tube of riflescope, ideal for Eyepiece diameter 40-45mm of riflescope.

If the diameters of the tube and eyepiece of your riflescope are smaller, you can wrap some camouflage on it, make the diameter bigger, and then mount the display mount and camera tube.

INSTALLATION:

  1. Put 2pcs of 18650 batteries in battery compartment on display, put 1pc in flashlight.
  2. Put TF card (Micro SD card) into the TF Card slot on the display.
  3. Install the display and IR flashlight on the optical sight with the mounts.
  4. Loosen screws, and centrally fix the camera tube in the rear of the eyepiece of the optical sight.
  5. Turn on the device and rotate the lens of the equipment (inside the tube) to adjust the focus to get sharp image.
  6. In the future application, if the image is blurred caused by the different distances of the objects, the image shall be clarified by adjusted the mounting position to change the distance between the camera and the optical sight.
Megaorei 2 Night Vision Operation Manual for Rifle Scope

Remark:

  1. Turn on the Device:

Step 1 – Shift up the Power switch on the battery compartment;

Step 2 – Long press the POWER ON/OFF button behind the display;

  1. Turn off the Device:

Step1 – Long press the POWER ON/OFF button behind the display;

Step2 – Shift down the Power switch on the battery compartment;

Remember to shift the switch on rear panel of the camera to Day mode when using in daytime, and to night mode at night.

BATTERIES INSTALL:

  1. Peel off the Insulation Sheet

If batteries are provided in the parcel, please don’t forget to peel off the insulation stick on the negative electrode.

  1. Battery Installation of the Screen

There is indication inside the battery compartment to show the positive and negative directions (the short spring contacts with the positive end of the battery and long spring contacts with the negative end), please follow it. (If batteries are provided in the parcel, please don’t forget to peel off the insulation stick on the negative electrode.)

  1. Battery Installation of the Flashlight

The positive end to the front of the flashlight, negative end connect with spring of the rear cap.

CABLE CONNECTION

Please connect the Micro USB coil cable of the 720p IR camera to the Micro USB socket on bottom of the battery compartment. Please connect the Micro USB cable of the screen to the top of the battery compartment.


(Wrongly cable connection will cause failure of file saving, “no file” warning will come out after take photo or record video, and no file will be stored.)

Megaorei Night Vision User Manual

DEFINITION OF THE BUTTONS

megaorei night vision instructions Sniper

MENU (OPERATION INTERFACE):

Press buttons behind the screen to operate, long press “OK/Menu” to Open or back to the menu, short press “OK/Menu” to select, short press “ ↓ ” to make the cursor down, short press “ ↑ ” to make the cursor up.

Megaorei 3 Operation Manual Megaorei 3 Instruction

CALIBRATION

To get sharp and clear image, you can adjust the followings:


  1. Adjust and put the IR camera on the pupil distance of the eyepiece.
  2. Rotate the Scope magnification adjustment wheel for clear image.
  3. Rotate the lens wheel of the IR camera for clear image.
  4. Shift to day mode in the day time (day vision colorful), shift to night mode at night (night vision black-white color).
  5. Click rear cap to turn on the IR flashlight and make night vision brighter.
  6. Stretch to get high beam for long distance, retract to get low beam for short distance.
  7. Adjust the position of the IR flashlight back and forth to make IR light overlap with the view of the scope.
megaorei 2 night vision User Guidance

CAMERA ADJUSTMENT:

The head of the IR flashlight is adjustable, stretch or retract to suitable length to get suitable brightness.

Megaorei2 IR Flashlight High Beam and Low Beam megaorei.net

TROUBLESHOOTING:

  1. The screen turns off after one minute every time.

You may have set 1 minute turn off in LCD OFF. Please go to menu, select LCD OFF, choose OFF, then the screen won’t shut down again.

  1. It indicates “no file” after taking picture or record video.

The cables may be wrongly connected. Please connect the cable from screen to the Micro USB socket on the top of the battery compartment. Connect the cable from camera to the Micro USB socket on the bottom of the battery compartment.

  1. The files damage after taking picture or record video.

Please shut down the screen by long pressing the POWER ON/OFF button behind the screen before cut off the power supply of the battery compartment. Otherwise, the files may damage.

  1. Unable to see any light when the IR flashlight is on.

The IR light is invisible to human naked eyes, only IR camera is sensitive to it. You can put it close to the wall. It would show slight red light while on. And when you turn the flashlight and IR camera night mode on at night, you can see the view is brighter.

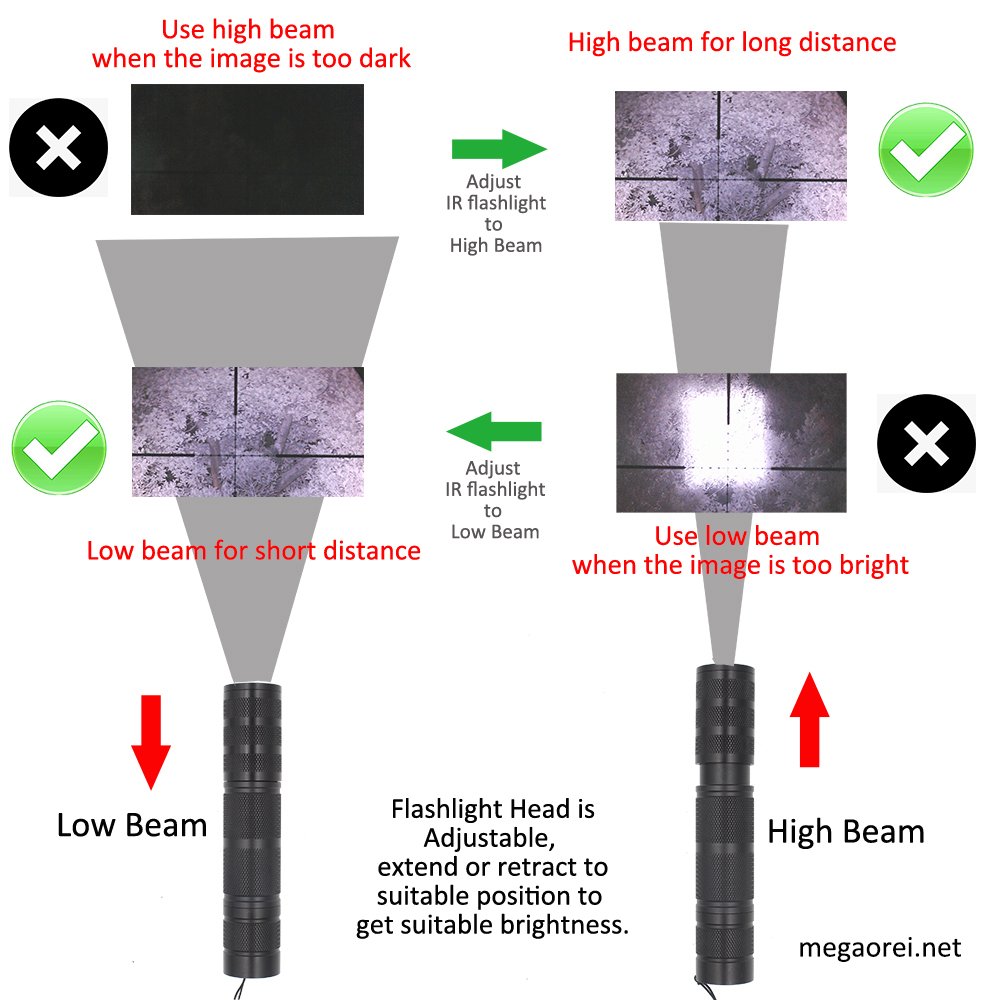
  1. The view is too dark at night.

Please shift the switch on the rear panel of the IR camera to night mode. And turn on the IR flashlight, stretch the head of the flashlight to get high beam, adjust to suitable brightness.

  1. The view is too bright.
  1. It will be too bright if the camera is in night mode but using in day time. Please shift the switch on the rear panel of the IR camera to day mode when using in day time.
  2. It will be too bright when the IR flashlight (torch) is too strong. The IR flashlight is adjustable, please rectract or stretch the head of the IR flashlight to get suitable brightness.
  3. The brightness of the screen is adjustable. Please go to menu, select LCD BRIGHTNESS, you can select brightness 25% to low down the brightness.
    1. The image is blur.

Please adjust your riflescope to get clear image by naked eyes first in daytime. Then put IR camera on the pupil Distance of the rifle scope (where you put your naked eye to see through the riflescope), and then rotate the lens of the IR camera to get clear picture.

  1. Unable to get clear image. Is it the problem of riflescope or the night vision kit.

You can take our night vision kit off the riflescope and test it without riflescope, normally, it can see up to 100 meter even without riflescope. If you can get clear image with day mode in daytime and with night mode at night, then it is the problem of riflescope (in many cases, it is the problem of calibration).

  1. The crosshair is not central on the screen.

Please adjust the tightness of the screws on the camera tube to make the crosshair central.

  1. The tube and eyepiece of the riflescope is too small to fix the camera tube and display on.

Please wrap some camouflage tape (included in the package) to make the tube or eyepiece OD larger, then mount the display or camera tube.

  1. The screen does not turn on.

Kindly check if you put the batteries in wrong direction. There is indication inside the battery compartment to show the positive and negative directions (the short spring contacts with the positive end of the battery and long spring contacts with the negative end), please follow it.

Please full charge your batteries, the screen won’t turn on in order to protect the IC inside the screen when the power of the battery is too low.

Please use the other batteries to check if it turns on now. The screen won’t turn on when the quality of the battery is not good enough.

  1. The screen blinks.

Please use the other batteries to check if it turns on now. The screen may blink when the quality of the battery is not good enough or low power.

TECHNOLOGY SUPPORT:

e-mail: max@megaorei.net

Mobile: +86-13530301775

Skype: maxchina.com

Wechat/WhatsAPP: +86-13530301775

Facebook Page: https://www.facebook.com/MegaoreiGroup

Facebook Group: https://www.facebook.com/groups/megaorei

Youtube Channel: https://www.youtube.com/c/MegaoreiGroup